Client-Side Image Optimization with WebAssembly
I am working on an application where users are uploading images on cloud (a S3 bucket in our case) from their device. One issue I’m addressing is the large size of these images. The images that the users upload are quite large so we need an image optimiser that will run on the client side to reduce the image size without compromising the quality of the images. I wanted a tool that will run on client side insted of server side to reduce the round trips. A populr option I found was using web assembly.
The Challenge: Large image uploads can slow down application performance. The Solution: In-browser image optimization using WASM.
Now before moving further, I want to discuss why I am not using javascript. This is theoretically possible, but I would recommend against it very strongly. It’s possible to create a javascript Img element which refers to an URL the user has typed in. You can then draw this image in an HTML5 canvas. You can then manually access the data on the canvas and analyze/convert the image to the approriate format. It might then be possible to send this Base64 or URL-encode to a server which could then return the image to the client. This is of course completely crazy and should NOT be attempted. This solution would require implementing JPG compression in javascript which, although technically possible, is probably not feasible because of browser constraints (eg. speed).
Now entered Web Assembly. It allows us to run binary files at a very high speed providing us a near native performance. we can write our code modules in any low level language (like C/C++ or Go) and then convert it into a binary file using a compiler(eg. Emscriptem compiler) that will be executed on our browser creating a .wasm file.
Now for our tool, I am not going to write my own converter in C or any other low level language, insted I am going to use .wasm module of FFmpeg. It is an free and open source tool for image, vided and audio rocessing. FFmpeg is a superstar in the world of multimedia processing.
Advantages of using WASM module
Reduced Server Load: Image processing happens on the client-side, minimizing server workload.
Faster Uploads: Smaller images upload faster, improving user experience.
Offline Functionality (Potential): With the right setup, image optimization might even work offline.
Security: Users’ data only lives inside their browser, no need to worry about any data leakage or network latency.
Client-side computing: Instead of hosting a cluster of server-end servers, we can now offload multimedia processing to client-side.
Flexible: ffmpeg.wasm comes with single-thread and multi-thread cores, you can use whichever fits your use case.
I will create another post about FFmpeg later, here I will discuss about using the library with NextJs. Read the documentation using this link.
ffmpeg.wasm
ffmpeg.wasm is a pure WebAssembly / JavaScript port of FFmpeg enabling video & audio record, convert and stream right inside browsers.
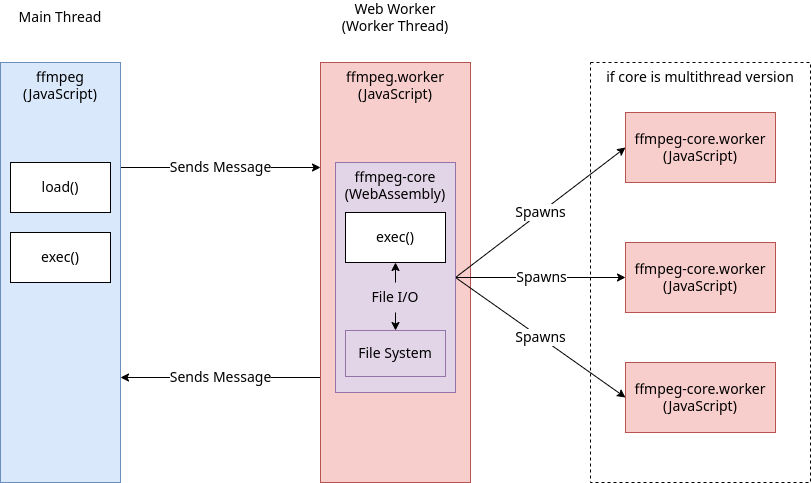 Architecture of FFmpeg
Multimedia transcoding is a resource-intensive task that you don’t want to execute in main thread, thus in ffmpeg.wasm we offload those task to web worker (ffmpeg.worker) by default. This makes almost all function calls in ffmpeg.wasm are asynchronous and it is recommended to use async/await syntax.
ffmpeg.worker downloads WebAssembly code (ffmpeg-core) from CDN and initialized it in WorkerGlobalScope. For any input video file you would like to process, you need to first populated them inside ffmpeg-core File System and also read result from ffmpeg-core File System once it is done.
If you are using a multi-thread version of ffmpeg-core, more web workers will be spawned by ffmpeg-core inside ffmpeg.worker
Packages
Packages All ffmpeg.wasm packages are under @ffmpeg name space:
@ffmpeg/ffmpeg
- Usage: Main ffmpeg.wasm package
- Use Case: This is the primary package used to interact with ffmpeg.wasm in your application. It provides a simplified interface for loading the core libraries and calling ffmpeg functions.
@ffmpeg/util
- Usage: Common utility functions
- Use Case: This package contains helper functions for common tasks such as working with buffers and file I/O. It can be useful for simplifying your ffmpeg.wasm development.
@ffmpeg/types
- Usage: TypeScript types
- Use Case: This package provides type definitions for the ffmpeg.wasm API. If you’re using TypeScript in your project, this package will help ensure type safety and improve code completion.
@ffmpeg/core
- Usage: Single-threaded ffmpeg.wasm core
- Use Case: This package contains the core WebAssembly code for ffmpeg.wasm, compiled for single-threaded execution. It’s generally not used directly and is loaded by @ffmpeg/ffmpeg.
@ffmpeg/core-mt
- Usage: Multi-threaded ffmpeg.wasm core
- Use Case: This package contains the core WebAssembly code for ffmpeg.wasm, compiled for multi-threaded execution. This allows for faster processing of media files by utilizing multiple cores on the user’s device. Use this package when performance is critical for your application.
FFmpeg CLI
FFmpeg is a universal media converter. It can read a wide variety of inputs - including live grabbing/recording devices - filter, and transcode them into a plethora of output formats.
- FFmpeg reads from an arbitrary number of input “files” (which can be regular files, pipes, network streams, grabbing devices, etc.), specified by the
-ioption, and writes to an arbitrary number of output “files”, which are specified by a plain output URL. Anything found on the command line which cannot be interpreted as an option is considered to be an output URL. - Each input or output URL can, in principle, contain any number of streams of different types (video/audio/subtitle/attachment/data). The allowed number and/or types of streams may be limited by the container format. Selecting which streams from which inputs will go into which output is either done automatically or with the
-mapoption (see the Stream selection chapter). - To refer to input files in options, you must use their indices (0-based). E.g. the first input file is 0, the second is 1, etc. Similarly, streams within a file are referred to by their indices. E.g. “2:3” refers to the fourth stream in the third input file. Also see the Stream specifiers chapter.
- As a general rule, options are applied to the next specified file. Therefore, order is important, and you can have the same option on the command line multiple times. Each occurrence is then applied to the next input or output file. Exceptions from this rule are the global options (e.g. verbosity level), which should be specified first.
- Do not mix input and output files – first specify all input files, then all output files. Also do not mix options which belong to different files. All options apply ONLY to the next input or output file and are reset between files.
Some simple examples follow:
- Convert an input media file to a different format, by re-encoding media streams:
1
ffmpeg -i input.avi output.mp4 - Set the video bitrate of the output file to 64 kbit/s:
1
ffmpeg -i input.avi -b:v 64k -bufsize 64k output.mp4
- Force the frame rate of the output file to 24 fps:
1
ffmpeg -i input.avi -r 24 output.mp4
- Force the frame rate of the input file (valid for raw formats only) to 1 fps and the frame rate of the output file to 24 fps:
1
ffmpeg -r 1 -i input.m2v -r 24 output.mp4
The format option may be needed for raw input files.
using ffmpeg with web applications
Following is a boilerplate code to convert image and video files into desired outputs
1
2
3
4
5
6
7
8
9
10
11
12
13
14
15
16
17
18
19
20
21
22
23
24
25
26
27
28
29
30
31
32
33
34
35
36
37
38
39
40
41
42
43
44
45
46
47
48
49
50
51
52
53
54
55
56
57
58
59
60
61
62
63
64
65
66
67
import { FFmpeg } from "@ffmpeg/ffmpeg";
import { fetchFile } from "@ffmpeg/util";

interface Action {
  file: string;
  to: string;
  file_name: string;
  file_type: string;
}

function getFileExtension(file_name: string): string {
  const match = /\.([^.]+)$/.exec(file_name);
  return match ? match[1] : ""; // No file extension found
}

function removeFileExtension(file_name: string): string {
  const lastDotIndex = file_name.lastIndexOf(".");
  return lastDotIndex !== -1 ? file_name.slice(0, lastDotIndex) : file_name;
}

export default async function convert(
  ffmpeg: FFmpeg,
  action: Action
): Promise<{ url: string; output: string }> {
  const { file, to, file_name, file_type } = action;
  const input = getFileExtension(file_name);
  const output = removeFileExtension(file_name) + "." + to;

  // Write file to FFmpeg
  await ffmpeg.writeFile(input, await fetchFile(file));

  // FFMEG COMMANDS
  const ffmpeg_cmd =
    to === "3gp"
      ? [
          "-i",
          input,
          "-r",
          "20",
          "-s",
          "352x288",
          "-vb",
          "400k",
          "-acodec",
          "aac",
          "-strict",
          "experimental",
          "-ac",
          "1",
          "-ar",
          "8000",
          "-ab",
          "24k",
          output,
        ]
      : ["-i", input, output];

  // execute cmd
  await ffmpeg.exec(ffmpeg_cmd);

  // Read the converted file from FFmpeg
  const data = await ffmpeg.readFile(output);
  const blob = new Blob([data], { type: file_type.split("/")[0] });
  const url = URL.createObjectURL(blob);

  return { url, output };
}
Usage
1
const { url, output } = await convertFile(ffmpegRef.current, action);
The potential drawback of this kind of arcitecture is the performance on low end PCs and mobile devices