cctv-surveillance
Neural Nexus Dashboard
Neural Nexus Dashboard is a comprehensive security and surveillance web application that leverages existing CCTV networks, machine learning, and real-time analytics to detect fights and manage broadcasts across various locations. The platform provides live feeds, historical logs, advanced analytics, and role-based controls to ensure efficient monitoring and rapid response.
Features
- Real-Time Fight Detection: Processes live CCTV video streams using a custom ML model with an AttentionLayer to detect fights in real time.
- Live Feed Display: Presents live video streams from security cameras with real-time ML predictions (fight vs. no fight).
- Historical Data Logging: Logs anomaly events and alarm history with detailed timestamps, durations, and actions taken.
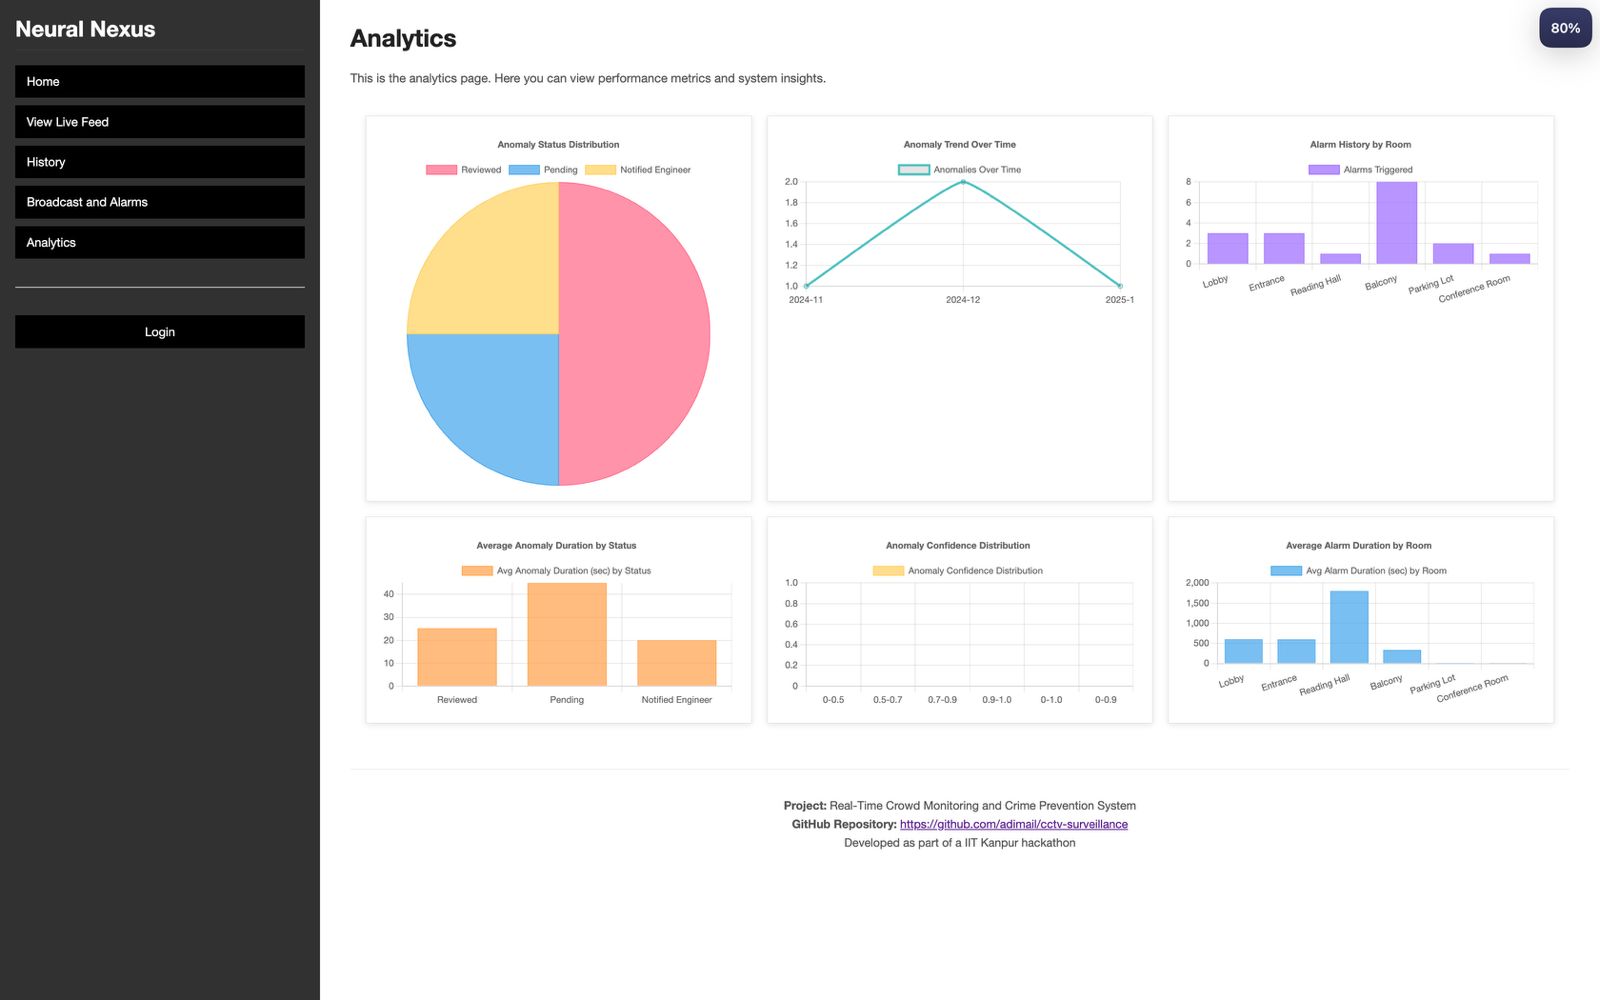
- Analytics Dashboard: Visualizes performance metrics and insights using Chart.js, including anomaly status distribution, trend analysis, and alarm durations.
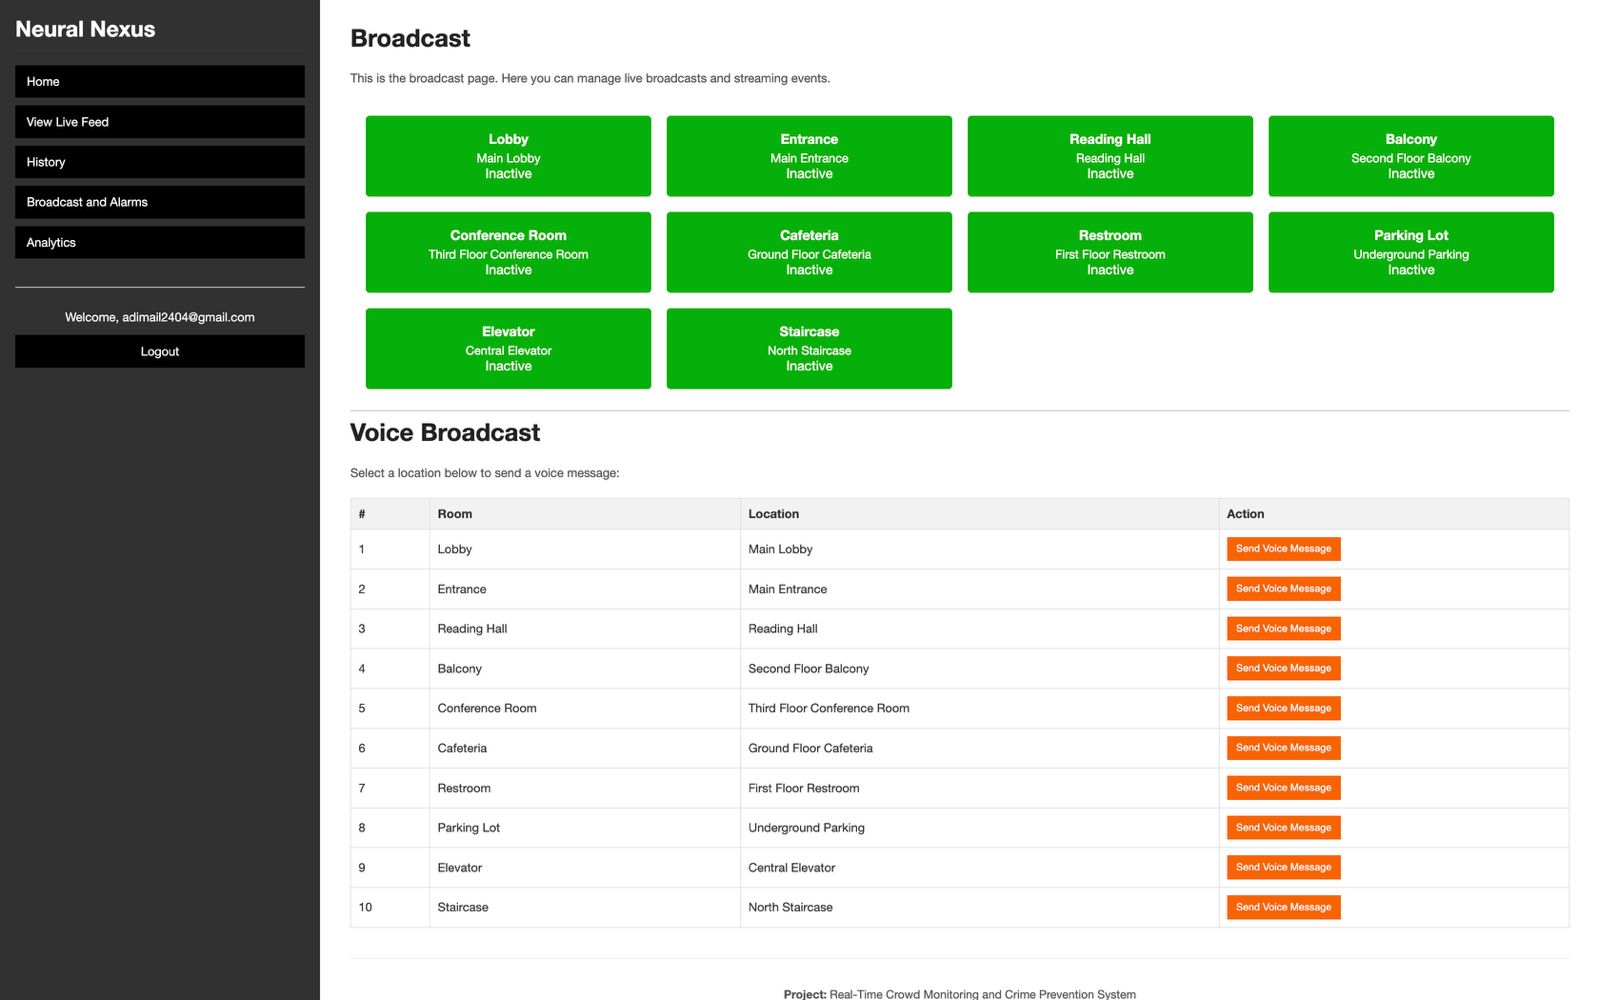
- Voice Broadcast: Allows admins to send voice messages to specific rooms by recording audio from the browser microphone.
- Text Broadcast: Enables admins to send text broadcast messages to various locations.
- Role-Based Access Control: Only authenticated users can view feeds, while administrative tasks such as broadcast and data management are restricted to admins.
- Rate Limiting: All routes are rate limited to prevent abuse using Flask-Limiter.
- Modular Architecture: Built using Flask blueprints for feed, broadcast, history, authentication, and analytics.
- Data Management Scripts: Includes scripts to seed sample data and clear anomalies and alarm history.
Machine Learning Model for Real-Time Fight Detection
The fight detection algorithm in Neural Nexus Dashboard is built by a custom deep learning model that combines state-of-the-art techniques from computer vision and sequential modeling. This approach leverages the strengths of Convolutional Neural Networks (CNNs), Bidirectional Long Short-Term Memory (Bi-LSTM) networks, and a custom self-attention mechanism to deliver accurate, real-time classification of fight scenes.
Model Architecture Overview
-
Spatial Feature Extraction (Xception-based CNN): The model uses a custom-trained variant of the Xception network (commonly referred to as Fight-CNN) as its backbone. This CNN extracts rich spatial features from individual video frames (with a resolution of 299×299×3). By using a pre-trained Xception model with ImageNet weights (which are frozen during initial training), the model benefits from robust feature representations learned on a large-scale dataset.
-
Temporal Dependency Modeling (Bi-LSTM): Once spatial features have been extracted from each frame, a Bidirectional LSTM layer processes the sequential data to capture temporal dependencies across frames. The bidirectional setup enables the model to understand context both forward and backward in time, which is essential for detecting the dynamic nature of fight scenes.
-
Attention Mechanism: A custom self-attention layer is integrated on top of the Bi-LSTM output. The attention layer assigns weights to the time steps (i.e., individual frames) by highlighting the most informative parts of the sequence for fight detection. This mechanism allows the model to focus on critical frames where violent actions occur while diminishing less relevant information.
Below is a simplified version of the custom attention layer:
class AttentionLayer(tf.keras.layers.Layer): def __init__(self, **kwargs): super(AttentionLayer, self).__init__(**kwargs) def build(self, input_shape): feature_dim = input_shape[-1] self.W = self.add_weight(name="att_weight", shape=(feature_dim, feature_dim), initializer="glorot_uniform", trainable=True) self.b = self.add_weight(name="att_bias", shape=(feature_dim,), initializer="zeros", trainable=True) self.u = self.add_weight(name="context_vector", shape=(feature_dim, 1), initializer="glorot_uniform", trainable=True) super(AttentionLayer, self).build(input_shape) def call(self, inputs): u_it = tf.nn.tanh(tf.tensordot(inputs, self.W, axes=1) + self.b) att = tf.tensordot(u_it, self.u, axes=1) att = tf.squeeze(att, axis=-1) att_weights = tf.nn.softmax(att, axis=1) att_weights_expanded = tf.expand_dims(att_weights, axis=-1) weighted_input = inputs * att_weights_expanded output = tf.reduce_sum(weighted_input, axis=1) return output -
Fully Connected Layers and Output: After the attention layer, the aggregated feature vector is passed through a series of dense layers with dropout regularization. This final part of the model maps the high-level features to the output classification—typically a softmax layer that produces probabilities for the “fight” versus “no fight” classes.
Model Building and Training
The overall model is constructed by combining the aforementioned layers in a sequential manner. Here is a high-level view of the building function:
def build_model(num_frames=10, num_classes=2, lstm_units=50, dense_units=1024, use_attention=True):
    input_seq = Input(shape=(num_frames, 299, 299, 3))
    base_cnn = Xception(weights='imagenet', include_top=False, pooling='avg', input_shape=(299,299,3))
    base_cnn.trainable = False

    td_cnn = TimeDistributed(base_cnn)(input_seq)
    bi_lstm = Bidirectional(LSTM(lstm_units, return_sequences=True))(td_cnn)

    if use_attention:
        attention_out = AttentionLayer()(bi_lstm)
    else:
        attention_out = tf.reduce_mean(bi_lstm, axis=1)

    fc1 = Dense(dense_units, activation='relu')(attention_out)
    fc1 = Dropout(0.5)(fc1)
    fc2 = Dense(50, activation='relu')(fc1)
    output = Dense(num_classes, activation='softmax')(fc2)

    model = Model(inputs=input_seq, outputs=output)
    return model
The model is compiled using the Adam optimizer (with a learning rate of 1e-4), a mean squared error loss function, and accuracy as the metric. Training is performed over 15 epochs with a data generator that supplies batches of 10-frame sequences. The training logs demonstrate a gradual improvement in accuracy—from an initial ~48% up to about 75%—and a steady decrease in loss, indicating effective learning of the fight detection task.
Performance and Impact
-
Improved Accuracy: The integration of the Xception-based CNN with the Bi-LSTM and attention layer significantly boosts the model’s performance in classifying fight scenes. This multi-component architecture outperforms traditional methods by effectively capturing both spatial details and temporal dynamics.
-
Real-Time Detection: By incorporating this model into the Neural Nexus Dashboard, security personnel can receive immediate alerts during live CCTV monitoring. The real-time inference capability ensures that violent incidents are detected quickly, enabling rapid response and improved public safety.
-
Research-Backed Design: The model architecture is inspired by cutting-edge research in vision-based action recognition and fight detection—for instance, approaches similar to those described in the paper Vision-based Fight Detection from Surveillance Cameras. This research has demonstrated the benefits of combining CNNs, Bi-LSTM networks, and attention mechanisms for accurately detecting fight scenes in varied environments.
Technologies Used
- Backend: Flask, Flask-Login, Flask-SQLAlchemy, Flask-Limiter, TensorFlow
- Frontend: HTML, CSS, JavaScript, Chart.js (via CDN)
- Machine Learning: Custom ML model with attention layer for fight detection
- Database: SQLite (local database file)
Installation
-
Clone the repository:
git clone https://github.com/adimail/cctv-surveillance.git cd cctv-surveillance -
Create a virtual environment and activate it:
python3 -m venv .venv source .venv/bin/activate # On Windows: .venv\Scripts\activate -
Install the required packages:
pip install -r requirements.txtTo test the application, you can run:
python3 -m tests.test_routes -
Set up the database:
Run the following command to build the SQLite database in the
instancefolder (this should be done the first time you run the application):python create_db.pyOptionally, use
clear_data.pyto reset anomaly and alarm history data. -
Build the Fight Detection Model:
The fight detection model is built and trained using a Jupyter Notebook available in a separate repository. To build the model:
-
Visit the following GitHub repository: https://github.com/adimail/ml-papers/blob/master/fight-detection/bi_LSTM_fight_detection.ipynb
-
Run the Jupyter Notebook in your preferred environment. The notebook includes all necessary scripts to build and train the model, and it will save a file named
fight_detection_model.h5. -
Once the model is saved, create a folder named
modelsin the root project directory of the Neural Nexus Dashboard and move thefight_detection_model.h5file into that folder. (Note: The model path is defined in theapp/model.pydirectory.)
Alternatively, you can run the
train_model.pyfile from the root directory, which contains the same training scripts. If you prefer this approach, make sure that you have the dataset cloned and placed in thedatafolder (as described in the instructions above) and then execute:python3 train_model.pyNote: You have to clone the repository manually, adjust the paths as needed, and run the notebook on your local machine if that suits your workflow better.
-
Running the Application
To run the application, execute:
python3 app.py
Then, open your browser and navigate to http://localhost:5000 to access the dashboard.
To Build and Run the Docker Container
From your project directory, run:
docker build -t neural-nexus-dashboard .
docker run -p 5000:5000 neural-nexus-dashboard
Then open your browser and navigate to http://localhost:5000 to access the dashboard.
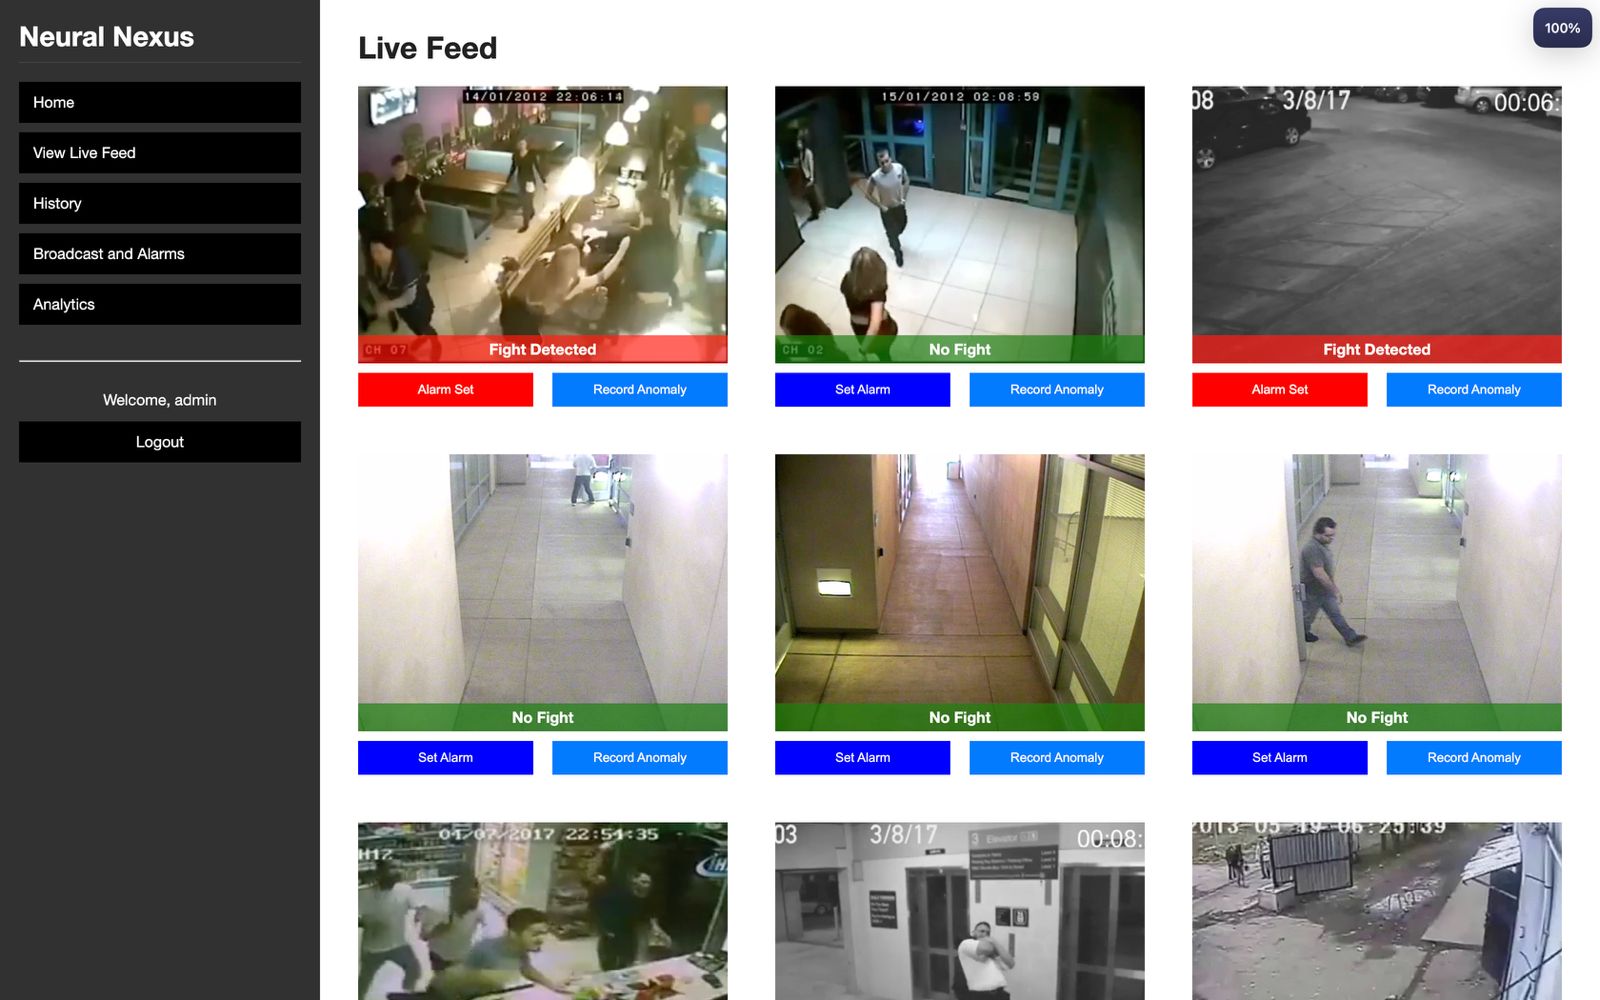
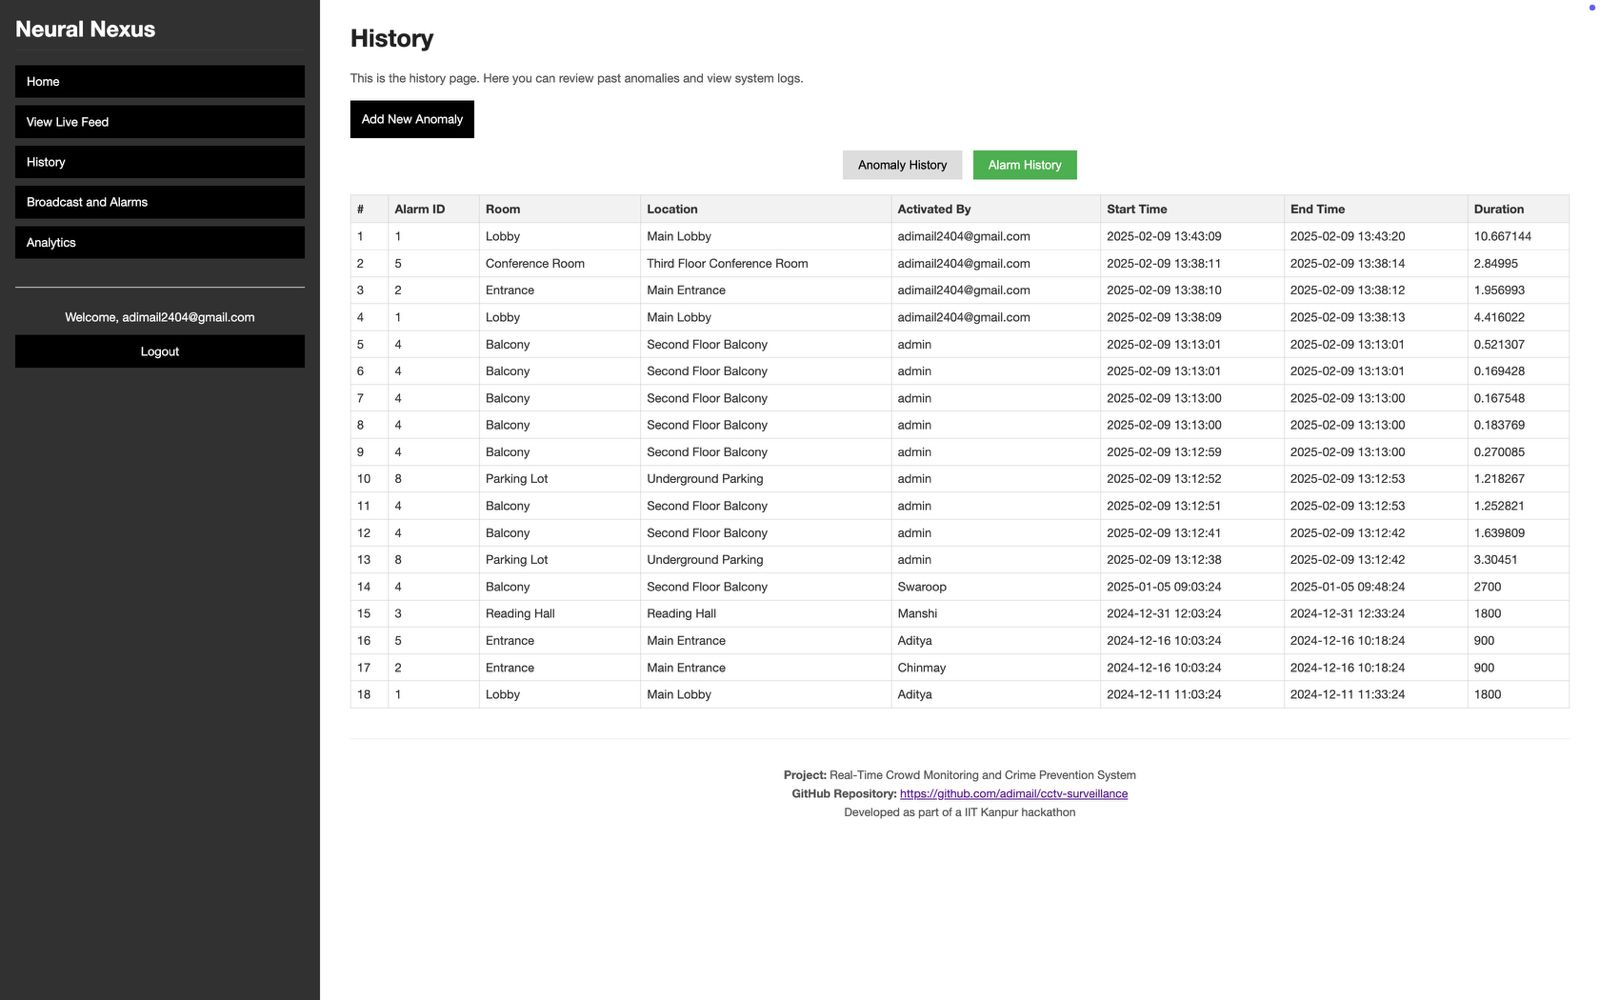
Screenshots
Below are sample screenshots demonstrating key features of the Neural Nexus Dashboard.
- Live Feed:
- History:
- Analytics Dashboard:
- Broadcast Page:
- Authorised access:
Usage
- Login: All users must log in. Only admins have access to broadcast, anomaly addition, and editing.
- Live Feed: Displays video streams from security cameras with real-time fight detection using an ML model.
- History: Admins can add and edit anomaly records while all users can view anomaly and alarm history.
- Analytics: Provides interactive charts for anomaly trends, status distribution, and alarm data.
- Broadcast: Admins can toggle alarms and send voice messages to designated rooms.
License
Acknowledgements
- Thanks to the contributors of Flask, TensorFlow, and Chart.js for making this project possible.
- This project was developed as part of an IIT Kanpur hackathon.